ОБЛАК
01-Окт-202522-Окт-2025
Конфигурирайте VPN потребители за компютърни и смартфон връзки
VPN потребителят представлява акаунт, който може да достъпва VPN мрежата директно от компютри или смартфони. Това е различно от VPN рутерите, които позволяват на цели локации да свържат всичките си компютри и устройства чрез една връзка.След като VPN потребителите се свържат, те могат да комуникират сигурно с хостове зад локации, свързани с VPN рутери, както и с вашите сървъри в Interspace облака.Нашето решение позволява много лесна настройка. Създавате потребителски профили в My Interspace контролния панел, след което вашите потребители настройват VPN клиент на своите компютри или смартфони с детайлите за достъп, които им изпращате. Те няма да се нуждаят от инсталиране на допълнителен софтуер, тъй като има вградени VPN клиенти в Windows, macOS, Linux, iOS и Android, които работят безупречно с нашата VPN система.
1.Configure VPN Users in My Interspace Control Panel
Sign in to the My Interspace control panel, select the Cloud VPN service from the home page, then open the VPN Users tab. This page contains two main sections: IP pools and user accounts. Before creating VPN users, you must configure at least one IP pool.1.1.Create IP Pools for VPN Client Connections
IP pools are ranges of private IP addresses that are automatically assigned to VPN clients when they connect to the VPN gateway. Each connecting user receives a temporary IP address from the configured pool, which they use for the duration of their VPN session. When the user disconnects, the IP address returns to the pool and becomes available for the next connection.The IP addresses in the pool must be within the private subnet where the VPN gateway belongs. For example, if the gateway is part of the subnet 10.0.0.0/24, your IP pool range must fall within 10.0.0.1 through 10.0.0.254. The pool should exclude the IP address of the VPN gateway and all other IP addresses already assigned to your cloud servers to prevent IP conflicts.To create an IP pool, open the VPN Users tab in the Cloud VPN service and click the Add button in the IP pools section. In the configuration dialog, enter a nickname to identify the pool and specify the first and last IP addresses for the range. Ensure the range contains enough addresses to accommodate all users who might connect simultaneously. For instance, a range from 10.0.0.100 to 10.0.0.150 provides 51 available addresses for concurrent VPN connections.IP pools provide powerful segmentation capabilities for access control. When remote users connect through specific pools, your cloud servers can be configured to allow or restrict access based on the source pool's IP range. For example, you can create separate pools for different departments - one pool for the accounting department (10.0.0.100-10.0.0.120) and another for the development team (10.0.0.150-10.0.0.180). Server firewalls can then be configured to allow access to sensitive applications only from specific pool ranges. This means your financial management application running on a cloud server can be configured to accept connections only from the accounting department's IP pool, while blocking all other VPN users.IP pools are particularly valuable for service providers hosting applications for multiple customers/organizations. If you are a CRM/ERP or similar provider running applications on separate cloud servers for different organizations, you can assign each organization their own dedicated IP pool. This allows you to configure server firewalls to ensure that VPN users from one organization can only access the designated servers for that organization, preventing any cross-organization access. For example, users from Organization A connecting from pool 10.0.0.100-10.0.0.120 can only reach servers configured for Organization A, while users from Organization B connecting from pool 10.0.0.150-10.0.0.180 can only access servers for Organization B.1.2.Create VPN User Accounts
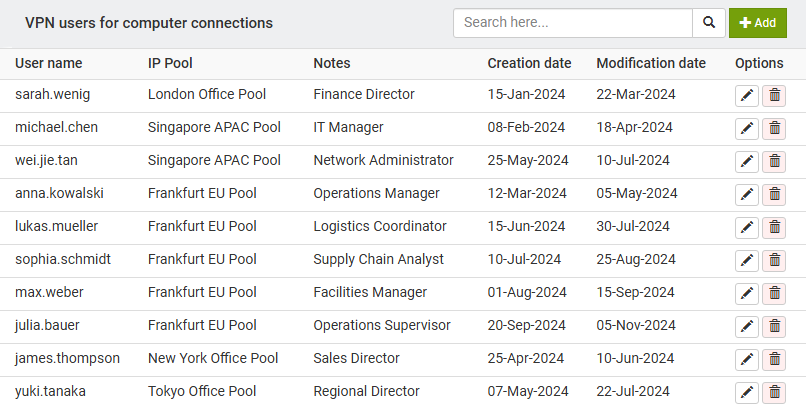
A VPN user account consists of a username, password and an assigned IP pool. These credentials allow individuals to authenticate and establish encrypted connections to your VPN gateway from their computers or smartphones.To create a VPN user account, open the VPN Users tab and locate the users section. Click the Add button to open the configuration dialog. Enter a unique username for the account and set a strong password that the user will use to authenticate. From the IP Pool dropdown menu, select the pool from which this user will receive an IP address upon connection. The system automatically assigns an available IP address from the selected pool when the user connects.You can optionally add notes to document the purpose of the account or the person using it. After creating the account, provide the username and password to the authorized person along with the VPN gateway domain for their client configuration.2.Configure VPN Client Software on User Devices
After creating VPN user accounts in My Interspace, the next step is configuring the VPN client software on the devices that will connect to your VPN. Most modern desktop and mobile operating systems include built-in VPN clients that support the protocols used by Interspace Cloud VPN.To configure a VPN client, open the VPN settings on your computer or smartphone. The exact location varies by operating system, but it is typically found in network settings or connection preferences. Create a new VPN connection and select IKEv2 or IPsec as the connection type. In the server address field, enter the domain of your VPN gateway (for example, unique-vpn-gateway.interspace.com). Enter the username and password you created for this VPN user account.When the configured VPN client initiates the connection, all network traffic destined for IP subnets within the virtual private network is encrypted and routed through the VPN tunnel. You can verify active connections by checking the Monitoring tab in the Cloud VPN service, which displays all currently connected users along with their assigned IP addresses and connection details.Below are step-by-step instructions for the most common platforms:2.1.Configure VPN Client on Windows
- Open VPN Settings. Click the Start menu, type "VPN settings" in the search bar and select VPN settings from the results. Alternatively, go to Settings > Network & Internet > VPN.
- Add VPN Connection. Click the Add VPN button to create a new VPN configuration.
- Select VPN Provider. From the VPN provider dropdown menu, select Windows (built-in).
- Enter Connection Name. In the Connection name field, enter a descriptive name for this VPN connection, such as "Interspace Cloud VPN".
- Enter Server Address. In the Server name or address field, enter the domain of your VPN gateway (for example, unique-vpn-gateway.interspace.com).
- Select VPN Type. From the VPN type dropdown menu, select IKEv2.
- Enter Credentials. In the User name and Password fields, enter the VPN user credentials you created in the control panel. Check the Remember my sign-in info box if you want to avoid entering credentials each time you connect.
- Save and Connect. Click Save to create the VPN connection. To connect, click the network icon in the system tray, select your VPN connection and click Connect.
2.2.Configure VPN Client on macOS
- Open Network Settings. Click the Apple menu in the top-left corner, select System Settings (or System Preferences on older macOS versions), then click Network.
- Add VPN Connection. Click the three-dot menu or the plus (+) button at the bottom of the connection list, then select Add VPN Configuration.
- Select VPN Type. In the VPN Type dropdown menu, select IKEv2.
- Enter Connection Name. In the Display Name or Service Name field, enter a descriptive name for this VPN connection, such as "Interspace Cloud VPN".
- Enter Server Address. In the Server Address and Remote ID fields, enter the domain of your VPN gateway (for example, unique-vpn-gateway.interspace.com).
- Configure Authentication. Under Authentication Settings, select Username as the authentication method. Enter your VPN username in the Username field and your password in the Password field.
- Save Configuration. Click Create or OK to save the VPN configuration.
- Connect to VPN. Toggle the connection switch or click Connect to establish the VPN connection. When connected, you will see a VPN icon in the menu bar at the top of your screen.
2.3.Configure VPN Client on iPhone
- Open Settings. On your iPhone home screen, tap the Settings app icon.
- Navigate to VPN Settings. Scroll down and tap General, then tap VPN & Device Management (or VPN on older iOS versions).
- Add VPN Configuration. Tap VPN, then tap Add VPN Configuration.
- Select Connection Type. At the top of the screen, tap Type and select IKEv2 from the list of available VPN protocols.
- Enter Connection Details. In the Description field, enter a name for this connection. In the Server field, enter the domain of your VPN gateway (for example, unique-vpn-gateway.interspace.com). Leave the Remote ID field empty or enter the same domain.
- Enter Credentials. In the Username and Password fields, enter the VPN user credentials you created in the control panel.
- Save Configuration. Tap Done in the upper right corner to save the VPN configuration.
- Connect to VPN. Toggle the Status switch next to your VPN connection to connect. When connected, you will see a VPN icon in the status bar at the top of your screen.
2.4.Configure VPN Client on Android Phones and Tablets
- Open Settings. On your Android phone or tablet, open the Settings app from your app drawer or notification shade.
- Navigate to VPN Settings. Tap Network & internet (or Connections on Samsung devices), then tap VPN. If prompted, set up a screen lock (PIN, pattern or password) as Android requires this for VPN connections.
- Add VPN Profile. Tap the plus (+) icon or Add VPN button in the upper right corner to create a new VPN profile.
- Enter Profile Name. In the Name field, enter a descriptive name for this VPN connection, such as "Interspace Cloud VPN".
- Select VPN Type. Tap Type and select IKEv2/IPSec MSCHAPv2 from the list of available VPN protocols.
- Enter Server Address. In the Server address field, enter the domain of your VPN gateway (for example, unique-vpn-gateway.interspace.com).
- Enter Credentials. In the Username and Password fields, enter the VPN user credentials you created in the control panel.
- Save and Connect. Tap Save to create the VPN profile. To connect, tap on the VPN profile you just created and tap Connect. When connected, you will see a key icon in your notification bar.
В този документ
- ↱ Въведение
- 1.Configure VPN Users in My Interspace Control Panel
- 1.1.Create IP Pools for VPN Client Connections
- 1.2.Create VPN User Accounts
- 2.Configure VPN Client Software on User Devices
- 2.1.Configure VPN Client on Windows
- 2.2.Configure VPN Client on macOS
- 2.3.Configure VPN Client on iPhone
- 2.4.Configure VPN Client on Android Phones and Tablets
Свързано съдържание
Документация

Облак

Комуникации

Хостинг

My Interspace
Технически статии

Уроци

Научете
Новини

Последни новини

Последни събития
Свързани продукти

Клауд VPN
Cloud VPN създава сигурна виртуална частна мрежа, която позволява криптирана комуникация между LAN мрежи на физически места, индивидуални компютри/смартфони и виртуални сървъри в Interspace Cloud.
Перфектно е подходяща за банки, софтуерни разработчици, CRM/ERP доставчици, здравни организации, правни фирми, счетоводни фирми, е-търговски бизнеси и глобално разпределени екипи.

Еластичен Облачен VPS
Elastic Cloud VPS е виртуална машина, работеща на усъвършенствани cloud и мрежови технологии, предлагаща превъзходни предимства пред традиционния VPS хостинг при изключително съотношение цена-производителност.
Разгърнете OS и приложения само за 1 минута. Гео-redundантни резервни копия с едно кликване, snapshot и възстановяване при бедствия. Процесори от ново поколение AMD EPYC, ултра бързо NVMe хранилище, дедицирани връзки и безплатна частна мрежа.

Балансьор на натоварването
Балансьорът на натоварването разпределя трафик на множество сървъри във вашата частна мрежа, осигурявайки висока производителност и redundantност. Проектиран за висока достъпност и голям брой връзки.
Предлага разширени функции, включително безплатни автоматични SSL сертификати, автоматичен failover, устойчивост на сесията, multiplексиране на връзки, WebSocket, ограничаване на скоростта по IP адрес и още.

Облачен NАТ Шлюз
Входящи и изходящи връзки през Интернет за вашите виртуални сървъри, които имат само частни IP адреси.
Сървърите достъпват Интернет като маршрутизират трафика през NAT шлюза. По избор, те могат да получават входящи връзки от Интернет чрез функцията за пренасочване на портове.
 Български
 English
 Deutsch
 Македонски
 Shqip
Shqip Slovenščina
 Srpski