CLOUD
05-Sep-202324-Jun-2025
Add Volumes of Block Storage as Attached Disks
The disk space of a virtual server can be increased by adding block storage volumes. In Interspace Cloud, these volumes are called "Attached Disks". They can be dynamically added, expanded or removed as your needs change, unlike Primary Disks which are permanently tied to your server. There are flexible backup options for Attached Disks, allowing you to control the redundancy level (Site or Geo Redundancy) and choose whether to include or exclude these disks from each automatic backup schedule, snapshot or VPS Image. Among other benefits, this helps you reduce backup costs. For example, you can create more frequent backups for system disks and less frequent backups for large attached disks.Despite their flexibility, Attached Disks are treated as persistent disks in the virtual server's operating system and can be retained and used for the entire server lifecycle, just like the primary disk where the operating system runs. Interspace Cloud infrastructure for block storage ensures maximum data protection and availability with these advanced features: 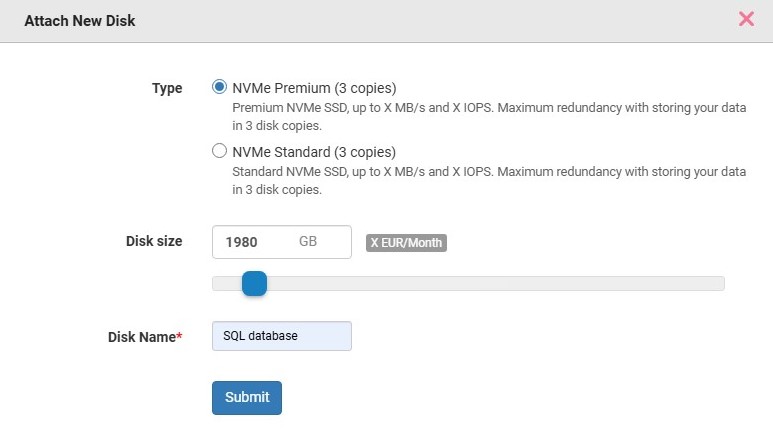
- Extreme availability through 8 independent controller systems per cluster that manage disk operations, ensuring that your disks will remain fully operational even if only one controller remains active.
- Data transfer using the leading Fibre Channel technology, with multiple communication channels per server for maximum performance and redundancy.
- Triple data protection with 3 identical copies of your data stored on separate hardware systems in different zones of the datacenter.
- Professional grade storage technology designed for critical operations that does not rely on open source solutions.
1.Add, Modify or Remove Attached Disks
Interspace Cloud provides comprehensive tools for managing Attached Disks on your cloud servers. To access these tools, sign into the My Interspace control panel, select the service associated with your server, and then navigate to the Disks tab.1.1.Add an Attached Disk to your server
To add an Attached Disk to your server, click the Attach New Disk button. The system will present you with a configuration dialog where you can customize your new storage volume according to your specific requirements.The first step involves selecting the storage type. Next, configure the disk size using the interactive slider or by entering a specific value in the text field. The system displays real-time pricing information as you adjust the size.After adding the disk, you will need to format and mount the filesystem from within the operating system of your server to utilize the additional disk space.1.2.Modify an Attached Disk
To modify an existing Attached Disk, locate the disk in the Attached Disks section and click the edit button (pencil symbol) on the right side of the box representing the disk.The modification dialog allows you to expand the disk size and adjust other configuration settings. Storage expansion is performed online without disrupting your server's operation.After expanding the disk size, you will need to extend the filesystem from within your operating system to utilize the additional space.1.3.Remove an Attached Disk from your server
To remove an Attached Disk from your server, locate the disk in the Attached Disks section and click the delete button (trash can symbol) on the right side of the box representing the disk.The system will display a confirmation dialog showing the details of the disk that will be deleted. This confirmation step prevents accidental deletion of your data.Before proceeding, ensure all important data has been backed up or migrated to another location. The deletion process permanently erases all data stored on the disk with no possibility of recovery.2.Configuring Attached Disks in Your Operating System
After adding or expanding an Attached Disk through the Interspace Cloud control panel, you must configure the disk within your server's operating system to make it accessible for use. This process involves partitioning, formatting and mounting the new storage space.For new disks, you will need to create partitions, format them with a filesystem and mount them to a directory. For expanded disks, you need to resize the existing partition and extend the filesystem to utilize the additional space.The following sections provide step-by-step instructions for the most common operating systems used on Interspace Cloud servers.2.1.Linux - Debian/Ubuntu
First, identify your new disk usinglsblk. New disks typically appear as /dev/sdb, /dev/sdc, etc. Replace sdb with your actual disk identifier in the commands below.Setup new disk:fdisk /dev/sdb - Create partition (type: n, p, 1, Enter, Enter, w)mkfs.ext4 /dev/sdb1 - Format with ext4 filesystemmkdir -p /home/attached-disk - Create mount directorymount /dev/sdb1 /home/attached-disk - Mount the diskecho "UUID=$(blkid -s UUID -o value /dev/sdb1) /home/attached-disk ext4 defaults 0 2" >> /etc/fstab - Make permanentExpand existing disk:growpart /dev/sda 2 - Resize partition (replace sda and partition number as needed)resize2fs /dev/sda2 - Extend ext4 filesystem2.2.Linux - CentOS/RHEL/Rocky Linux
First, identify your new disk usinglsblk. These distributions typically use XFS filesystem by default. Replace sdb with your actual disk identifier in the commands below.Setup new disk:fdisk /dev/sdb - Create partition (type: n, p, 1, Enter, Enter, w)mkfs.xfs /dev/sdb1 - Format with XFS filesystemmkdir -p /home/attached-disk - Create mount directorymount /dev/sdb1 /home/attached-disk - Mount the diskecho "UUID=$(blkid -s UUID -o value /dev/sdb1) /home/attached-disk xfs defaults 0 2" >> /etc/fstab - Make permanentExpand existing disk:growpart /dev/sda 2 - Resize partition (replace sda and partition number as needed)xfs_growfs / - Extend XFS filesystem2.3.Windows Server
Open the Disk Management console by right-clicking This PC and selecting Manage, then navigate to Storage > Disk Management. New disks will appear as unallocated space.Setup new disk:Right-click the unallocated space and select New Simple Volume. Follow the New Simple Volume Wizard to create a partition, assign a drive letter (such as D: or E:), and format the disk with NTFS filesystem. You can accept the default settings for most options.Expand existing disk:Right-click the existing partition that you want to expand and select Extend Volume. The Extend Volume Wizard will guide you through extending the partition to use the additional unallocated space that appears after expanding the disk in the Interspace Cloud control panel.Previous: Access Server via Web Console
In this document
Related content
Documentation

Cloud

Communications

Hosting

My Interspace
Tech Articles

Tutorials

Learn
News

Latest news

Latest events
Related products

Elastic Cloud VPS
Elastic Cloud VPS is a virtual machine running on advanced cloud and networking technologies, offering superior advantages over traditional VPS hosting at an exceptional price-to-performance ratio.
Deploy OS and apps in just 1 min. One-click geo-redundant backups, snapshots and disaster recovery. Next-generation AMD EPYC processors, ultra-fast NVMe storage, dedicated connections and free private networking.

Load Balancer
The Load Balancer distributes traffic to multiple servers in your private network, ensuring high performance and redundancy. Designed for high availability and large numbers of connections.
It offers advanced features, including free automatic SSL certificates, automatic failover, session persistence, connection multiplexing, WebSocket, per-IP rate limiting and more.

Cloud NАТ Gateway
Inbound and outbound connections over the Internet, for your virtual servers that have only private IP addresses.
The servers access the Internet by routing the traffic through the NAT gateway. Optionally, they can receive inbound connections from the Internet using the port forwarding feature.

Cloud VPN
Cloud VPN creates a secure virtual private network that enables encrypted communication between LAN networks at physical sites, individual computers/smartphones and virtual servers in Interspace Cloud.
It is perfectly suited for banks, software developers, CRM/ERP service providers, healthcare organizations, legal firms, accounting firms, e-commerce businesses and globally dispersed teams.
 English
 Deutsch
 Македонски
 Shqip
Shqip Slovenščina
 Srpski
 Български