CLOUD
01-Oct-202522-Oct-2025
Configure VPN Routers for Site Connections
A VPN router is a physical network device that connects an entire site/location with your VPN network. You can deploy them at headquarters, branch offices, retail locations and other facilities. The VPN router enables all computers and devices on the private networks at that site to communicate securely with other connected sites and with your servers in the Interspace Cloud.Our solution enables very easy setup. You create router profiles in the My Interspace control panel. You specify settings such as private subnets to route through the VPN network and access details. Routers are then configured based on these profile settings. You can also designate a router to serve as an internet gateway for all connected sites.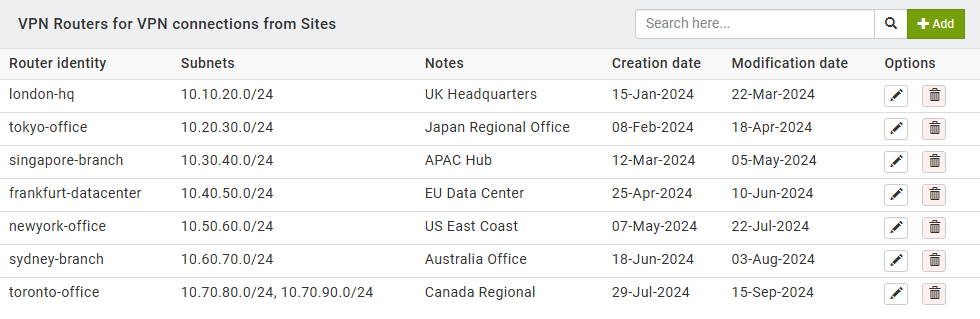
1.Configure Router Profiles in My Interspace Control Panel
Sign in to the My Interspace control panel, select the Cloud VPN service from the home page and open the VPN Routers tab. This page displays all configured router profiles with their identity, subnets and connection details. Each router profile represents a site-to-site VPN tunnel that connects a remote location to the VPN gateway located in the Interspace Cloud. Once connected to the VPN gateway, the VPN router and all hosts behind it join the virtual private network.1.1.Add VPN Router Profile
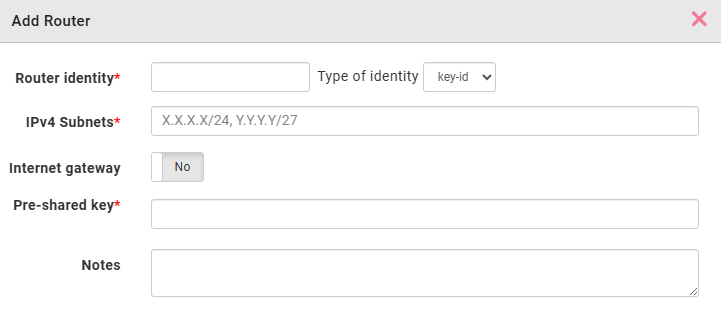
To add a new router profile, click the Add button. In the configuration dialog, configure the following parameters that will also be needed when setting up your physical router device.- Router identity. The identifier for authentication. From the Type of identity dropdown menu, select the format: key-id for an arbitrary string, fqdn for a fully qualified domain name like router1.example.com, or email for an email format such as [email protected].
- IPv4 Subnets. The private network ranges at your remote site. Enter one or more IP subnets in CIDR notation, separated by commas, for example 192.168.1.0/24, 192.168.2.0/24. These subnets represent the networks behind your router that will be accessible through the VPN tunnel. Traffic destined for these subnets from other endpoints will be routed through the VPN gateway to this site.
- Internet gateway. Determines whether this router will route internet-bound traffic through the VPN tunnel. When enabled, all internet traffic from the remote site passes through the VPN gateway before reaching the internet. This is useful for centralizing internet access control and monitoring. For other sites to use this router as their internet gateway, they must configure this router's IP address as their gateway.
- Pre-shared key. The authentication secret. Generate a strong, random key using a combination of letters, numbers and special characters. Store it securely, as you will need it when configuring your physical router.
- Notes. Optional field for descriptive information about the router location or purpose for future reference.
1.2.Configure Your Physical Router Device
After creating the router profile, configure your physical router device to establish the VPN connection. The exact steps vary by router brand and model, but all require the same parameters from the profile you just created.Access your router's administration interface and locate the VPN or IPsec configuration section. Create a new IPsec/IKEv2 connection using the following parameters from your router profile: enter the VPN gateway domain name (for example unique-vpn-gateway.interspace.com) as the remote server, set the local identity to match your router identity using the same identity type, enter the pre-shared key, and configure the local subnets to match the IPv4 subnets from the profile.For IKEv2 encryption settings, use strong modern ciphers such as AES-256 or AES-128 for encryption, SHA-256 or SHA-512 for integrity and Diffie-Hellman group 14 or higher for key exchange.Save the configuration and initiate the connection from your router. Once the connection is established, you can verify it under the Monitoring tab in the Cloud VPN service, which displays all active router connections with their status and traffic statistics.Related content
Documentation

Cloud

Communications

Hosting

My Interspace
Tech Articles

Tutorials

Learn
News

Latest news

Latest events
Related products

Cloud VPN
Cloud VPN creates a secure virtual private network that enables encrypted communication between LAN networks at physical sites, individual computers/smartphones and virtual servers in Interspace Cloud.
It is perfectly suited for banks, software developers, CRM/ERP service providers, healthcare organizations, legal firms, accounting firms, e-commerce businesses and globally dispersed teams.

Elastic Cloud VPS
Elastic Cloud VPS is a virtual machine running on advanced cloud and networking technologies, offering superior advantages over traditional VPS hosting at an exceptional price-to-performance ratio.
Deploy OS and apps in just 1 min. One-click geo-redundant backups, snapshots and disaster recovery. Next-generation AMD EPYC processors, ultra-fast NVMe storage, dedicated connections and free private networking.

Load Balancer
The Load Balancer distributes traffic to multiple servers in your private network, ensuring high performance and redundancy. Designed for high availability and large numbers of connections.
It offers advanced features, including free automatic SSL certificates, automatic failover, session persistence, connection multiplexing, WebSocket, per-IP rate limiting and more.

Cloud NАТ Gateway
Inbound and outbound connections over the Internet, for your virtual servers that have only private IP addresses.
The servers access the Internet by routing the traffic through the NAT gateway. Optionally, they can receive inbound connections from the Internet using the port forwarding feature.
 English
 Deutsch
 Македонски
 Shqip
Shqip Slovenščina
 Srpski
 Български