CLOUD
05-Jan-201815-Jan-2024
Add/Remove Public IP Addresses
Interspace Cloud offers a comprehensive toolkit designed for the efficient management of public IP addresses on your cloud servers. To access these tools, sign into the My Interspace control panel, select the service associated with your server, and then navigate to the IP addresses/Network tab.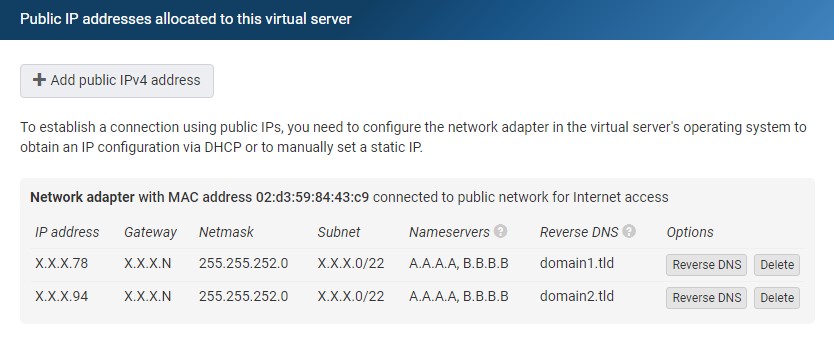

1.Public IPv4 Address Setup
To assign a new public IPv4 address to your server, click Add public IPv4 address. The system automatically selects the next available address. The number of addresses you can add depends on your chosen plan, with a specific limit on the maximum number of public IP addresses allowed per cloud server.The IP addresses/Network tab displays a tabular list that includes detailed information and management tools for allocated public IPv4 addresses. This list offers functionalities such as the removal of an IP address and the setup of reverse DNS. The details provided for each IP address include: IP address, Gateway, Netmask, Subnet, Nameservers, Reverse DNS, and the MAC address of the virtual interface. The MAC address of the virtual interface displayed here is particularly useful as it helps you to uniquely identify the specific interface within your operating system, allowing you to configure the correct interface.Upon adding a new IPv4 address through the My Interspace control panel, the address is instantly registered within our routing systems and configured for immediate use with the DHCP server. This integration ensures that if your virtual server's network interface is set to obtain an IP address automatically via DHCP, the newly added public IPv4 address will be acquired without further action required on your part.However, if your deployment scenario require a specific IP configuration, like custom DNS servers, you need to manually configure your network settings manually. This involves specifying the IP address, subnet mask, gateway, and DNS servers within the operating system's network configuration tools. You can find theses details in the tabular list mentioned above.Please note that if you allocate multiple public IP addresses on the server, manual configuration for static IP addresses is required because the DHCP server can not deliver multiple IP addresses to the same interface. Detailed guidance on configuring these settings is provided in the following section.2.Setup Multiple Public IP Addresses on a Single Server
Manual configuration for multiple public IP addresses is required due to DHCP standards, which allow only one IP address per network interface to be assigned automatically by DHCP servers. Follow these steps to add additional IP addresses to a single network interface in Windows and some common Linux distros.2.1.Setup Multiple IPs on Windows
- Open Network Connections: Navigate to the Control Panel, click on "Network and Sharing Center," and then select "Change adapter settings" on the left. Right-click the network adapter you wish to configure and choose "Properties."
- Access TCP/IPv4 Properties: Locate "Internet Protocol Version 4 (TCP/IPv4)," select it, then click the "Properties" button.
- Open Advanced TCP/IP Settings: In the TCP/IPv4 properties window, click the "Advanced" button to access additional settings.
- Add Additional IP Addresses:
- In the "Advanced TCP/IP settings" window, under the "IP Settings" tab, you'll find the list of IP addresses currently assigned to your adapter.
- Click "Add" under the "IP addresses" section to enter a new IP address and subnet mask. After entering the details for your new IP address, click "Add."
- Repeat for Multiple IPs: If you need to configure more than one additional IP address, repeat the previous step for each new address.
- Close and Save: After adding all necessary IP addresses, click "OK" on each window to save your settings.
2.2.Setup Multiple IPs on Linux Debian/Ubuntu
- Edit the Network Interfaces File: Open the /etc/network/interfaces file:
sudo nano /etc/network/interfaces - Add the Additional IP Configuration: Add the following lines for each additional IP address:
auto eth0
iface eth0 inet static
    address X.X.X.1/24
iface eth0:0 inet static
address X.X.X.2/24 - Restart Networking: Apply the changes by restarting the networking service:
sudo systemctl restart networking
2.3.Setup Multiple IPs on Linux RHEL/CentOS/AlmaLinux/Rocky
- Edit the Network Script: Open the network script for your interface, typically found at /etc/sysconfig/network-scripts/ifcfg-[INTERFACE_NAME]:
sudo nano /etc/sysconfig/network-scripts/ifcfg-eth0 - Add the Additional IP Configuration: Add the following lines for each additional IP address:
DEVICE=eth0
BOOTPROTO=static
IPADDR=X.X.X.1
PREFIX=24
ONBOOT=yes
DEVICE=eth0:0
IPADDR=X.X.X.2
PREFIX=24 - Restart Networking: Apply the changes by restarting the network service:
sudo systemctl restart network
3.Isolated Communication Between Public IPs
Public IP addresses in the Interspace Cloud platform are managed using Private VLAN technology. This advanced technology ensures secure isolation between the customers of Interspace, even when multiple hosts share a common IP subnet that might also contain IP addresses allocated to other customers. Unlike traditional network setups where hosts in the same subnet can directly exchange Layer 2 traffic as part of the same broadcast domain, Private VLAN technology prevents such direct interactions. Instead, any communication between these hosts must pass through the gateway, similar to how traffic moves between different Layer 3 subnets. This setup prevents potential eavesdropping or tampering with the data traffic between customers' systems.Previous: Creating a new server
In this document
- ↱ Intro - Add/Remove Public IP Addresses
- 1.Public IPv4 Address Setup
- 2.Setup Multiple Public IP Addresses on a Single Server
- 2.1.Setup Multiple IPs on Windows
- 2.2.Setup Multiple IPs on Linux Debian/Ubuntu
- 2.3.Setup Multiple IPs on Linux RHEL/CentOS/AlmaLinux/Rocky
- 3.Isolated Communication Between Public IPs
Related content
Documentation

Cloud

Communications

Hosting

My Interspace
Tech Articles

Tutorials

Learn
News

Latest news

Latest events
Related products

Elastic Cloud VPS
Elastic Cloud VPS is a virtual machine running on advanced cloud and networking technologies, offering superior advantages over traditional VPS hosting at an exceptional price-to-performance ratio.
Deploy OS and apps in just 1 min. One-click geo-redundant backups, snapshots and disaster recovery. Next-generation AMD EPYC processors, ultra-fast NVMe storage, dedicated connections and free private networking.

Load Balancer
The Load Balancer distributes traffic to multiple servers in your private network, ensuring high performance and redundancy. Designed for high availability and large numbers of connections.
It offers advanced features, including free automatic SSL certificates, automatic failover, session persistence, connection multiplexing, WebSocket, per-IP rate limiting and more.

Cloud NАТ Gateway
Inbound and outbound connections over the Internet, for your virtual servers that have only private IP addresses.
The servers access the Internet by routing the traffic through the NAT gateway. Optionally, they can receive inbound connections from the Internet using the port forwarding feature.

Cloud VPN
Cloud VPN creates a secure virtual private network that enables encrypted communication between LAN networks at physical sites, individual computers/smartphones and virtual servers in Interspace Cloud.
It is perfectly suited for banks, software developers, CRM/ERP service providers, healthcare organizations, legal firms, accounting firms, e-commerce businesses and globally dispersed teams.
 English
 Deutsch
 Македонски
 Shqip
Shqip Slovenščina
 Srpski
 Български